

zabbix proxy 使用场景:
- 监控远程区域设备
- 监控本地网络不稳定区域
- 当 zabbix 监控上千设备时,使用它来减轻 server 的压力
- 简化分布式监控的维护
导入数据库
mysql> create database zabbix_proxy charset utf8;
Query OK, 1 row affected (0.00 sec)
mysql> grant all on zabbix_proxy.* to "zabbix_proxy"@'10.1.2.%' identified by 'zabbix_proxy';
Query OK, 0 rows affected (0.00 sec)
mysql> flush privileges;
Query OK, 0 rows affected (0.00 sec)
mysql> use zabbix_proxy;
Database changed
mysql> source /opt/download/zabbix/schema_centos7.sql;
参考文档:
http://xiaoheidiannao.com/69740.html
https://blog.csdn.net/weixin_45799981/article/details/110132057
选择有外网的服务器安装proxy
[root@internet-proxy zabbix]# yum localinstall -y zabbix-proxy-mysql-3.4.2-1.el7.x86_64.rpm
需要监控的服务器安装zabbix_agent
[root@cqdsrmyy-app-01 zabbix]# rpm -ivh zabbix-agent-3.4.15-1.el7.x86_64.rpm
配置zabbix_proxy
#ProxyMode=0 #0为主动, 1为被动
Server=XXX.XXX.XXX.XXX ##zabbix-server的ip
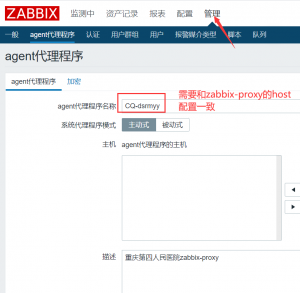
Hostname=CQ-dsrmyy ## web端代理程序名称
LogFile=/var/log/zabbix/zabbix_proxy.log #指定日志文件位置
LogFileSize=0
PidFile=/var/run/zabbix/zabbix_proxy.pid #pid文件位置
SocketDir=/var/run/zabbix
DBHost=10.1.2.XX ##数据库地址
DBName=zabbix_proxy ##数据库的库名
DBUser=zabbix_proxy ##登录数据库的用户
DBPassword=zabbix_proxy ##数据库密码
HeartbeatFrequency=60 #心跳间隔检测时间,默认60秒,范围0-3600秒, 被动模式不使用
ConfigFrequency=60 #间隔多久从zabbix server 获取监控信息
DataSenderFrequency=1 #数据发送时间间隔,默认为1秒,范围为1-3600秒,被动模式不使用
SNMPTrapperFile=/var/log/snmptrap/snmptrap.log
Timeout=4
ExternalScripts=/usr/lib/zabbix/externalscripts
LogSlowQueries=3000
AllowRoot=1
启动zabbix-proxy
systemctl start zabbix-proxy
提示报错:
23017:20210330:102931.823 using configuration file: /etc/zabbix/zabbix_proxy.conf
 23017:20210330:102931.824 cannot set resource limit: [13] Permission denied
 23017:20210330:102931.824 cannot disable core dump, exiting...
 23022:20210330:102942.067 Starting Zabbix Proxy (active) [CQ-dsrmyy]. Zabbix 3.4.2 (revision 72885).
 23022:20210330:102942.067 **** Enabled features ****
 23022:20210330:102942.067 SNMP monitoring:       YES
 23022:20210330:102942.067 IPMI monitoring:       YES
 23022:20210330:102942.067 Web monitoring:        YES
 23022:20210330:102942.067 VMware monitoring:     YES
 23022:20210330:102942.068 ODBC:                  YES
 23022:20210330:102942.068 SSH2 support:          YES
 23022:20210330:102942.068 IPv6 support:          YES
 23022:20210330:102942.068 TLS support:           YES
 23022:20210330:102942.068 **************************
 23022:20210330:102942.068 using configuration file: /etc/zabbix/zabbix_proxy.conf
 23022:20210330:102942.068 cannot set resource limit: [13] Permission denied
 23022:20210330:102942.068 cannot disable core dump, exiting...
 23029:20210330:102952.319 Starting Zabbix Proxy (active) [CQ-dsrmyy]. Zabbix 3.4.2 (revision 72885).
 23029:20210330:102952.319 **** Enabled features ****
 23029:20210330:102952.319 SNMP monitoring:       YES
 23029:20210330:102952.319 IPMI monitoring:       YES
 23029:20210330:102952.319 Web monitoring:        YES
 23029:20210330:102952.319 VMware monitoring:     YES
 23029:20210330:102952.319 ODBC:                  YES
 23029:20210330:102952.319 SSH2 support:          YES
 23029:20210330:102952.319 IPv6 support:          YES
 23029:20210330:102952.319 TLS support:           YES
 23029:20210330:102952.319 **************************
 23029:20210330:102952.319 using configuration file: /etc/zabbix/zabbix_proxy.conf
 23029:20210330:102952.320 cannot set resource limit: [13] Permission denied
 23029:20210330:102952.320 cannot disable core dump, exiting...
关闭selinux解决
参考文档:https://blog.csdn.net/xyz846/article/details/81904924
配置zabbix_agentd.conf
[root@internet-proxy zabbix]# vim zabbix_agentd.conf
PidFile=/var/run/zabbix/zabbix_agentd.pid
LogFile=/var/log/zabbix/zabbix_agentd.log
LogFileSize=0
Server=10.1.2.242				###被动模式的server IP地址,如果为纯主动模式可以注释
ServerActive=10.1.2.242			#主动模式的serverIP地址
Hostname=10.1.2.244				#重要:客户端的hostname,不配置则使用主机名
AllowRoot=1
Include=/etc/zabbix/zabbix_agentd.d/*.conf
启动zabbix-agent
服务启动报错
root@cqdsrmyy-mysql-02 zabbix]# journalctl -xe
-- Unit zabbix-agent.service has failed.
--
-- The result is failed.
Mar 29 22:57:46 cqdsrmyy-mysql-02 systemd[1]: Unit zabbix-agent.service entered failed state.
Mar 29 22:57:46 cqdsrmyy-mysql-02 systemd[1]: zabbix-agent.service failed.
Mar 29 22:57:56 cqdsrmyy-mysql-02 systemd[1]: zabbix-agent.service holdoff time over, scheduling
Mar 29 22:57:56 cqdsrmyy-mysql-02 systemd[1]: Starting Zabbix Agent...
-- Subject: Unit zabbix-agent.service has begun start-up
-- Defined-By: systemd
-- Support: http://lists.freedesktop.org/mailman/listinfo/systemd-devel
--
-- Unit zabbix-agent.service has begun starting up.
Mar 29 22:57:56 cqdsrmyy-mysql-02 zabbix_agentd[15795]: zabbix_agentd [15797]: cannot open "/var/
Mar 29 22:57:56 cqdsrmyy-mysql-02 systemd[1]: PID file /run/zabbix/zabbix_agentd.pid not readable
Mar 29 22:57:56 cqdsrmyy-mysql-02 systemd[1]: zabbix-agent.service never wrote its PID file. Fail
Mar 29 22:57:56 cqdsrmyy-mysql-02 systemd[1]: Failed to start Zabbix Agent.
-- Subject: Unit zabbix-agent.service has failed
-- Defined-By: systemd
-- Support: http://lists.freedesktop.org/mailman/listinfo/systemd-devel
--
-- Unit zabbix-agent.service has failed.
--
-- The result is failed.
Mar 29 22:57:56 cqdsrmyy-mysql-02 systemd[1]: Unit zabbix-agent.service entered failed state.
Mar 29 22:57:56 cqdsrmyy-mysql-02 systemd[1]: zabbix-agent.service failed.
原因:selinux未关闭
执行 setenforce 0
然后重启zabbix-agent即可
接下来配置zabbix-server--》zabbix-proxy---》zabbix-agent
在zabbix-server的web端添加zabbix-proxy
创建被监控的主机
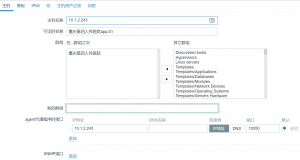
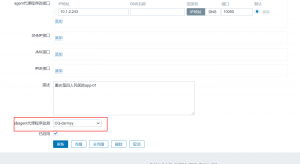
选择“由agent代理程序监测“。
创建好主机之后进行模板套用,给主机添加监控项。过程略,有需要后面写相关文章说明。